Win32 x86 Assembly - Hello World
Introduction
This post is a thorough walk-through of how to create a “hello world” application using x86 assembly language in the Windows environment. I’ll walk you through how to compile and run a bare minimum, hello-world-like, Windows assembly language program.
We might start by asking…why? Why would anyone want to do this? Why not program in C, C++, C#, Java, etc?
I can only think of one reason: as a learning experience to better understand what’s going on under the hood. (Otherwise, in practice, it’s a really bad idea: assembly language is extremely hard both to write and to read, and usually has nearly-impossible-to-avoid subtle bugs scattered throughout the code.)
My assumption is that most people don’t know x86 assembly language, so I’ll explain everything.
Hello, world
First, I’ll show you how to compile and run a minimal Microsoft Windows GUI application—an application that simply opens a blank window, with a button, that pops up an alert box when you click the button—written in assembly language. We’ll do this using the Windows API—Microsoft’s standard, native Windows programming API, and we’ll use the Microsoft Macro Assembler (MASM) .
Then, I’ll explain the code. With Windows native programming, writing a simple application actually a non-trivial task. Even in C and C++, writing simple Windows applications is daunting for a beginner.
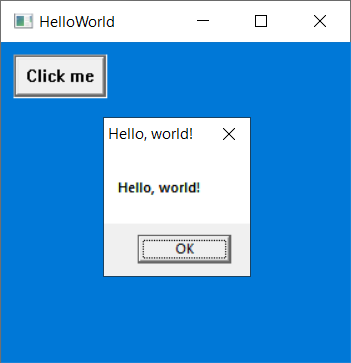
Here’s what the application should look like:
Let’s look at the entire code:
;################################################
;              -- HelloWorld.asm --
;     Jay Sullivan             Public Domain
;################################################

;================================================
;              Meta-Directives
;================================================

.386                ; Use 80386+ instruction set
.MODEL FLAT,STDCALL ; Flat memory model, STDCALL argument passing
OPTION CASEMAP:NONE ; Case sensitive procedure names

;================================================
;              Header
;================================================

    ;-------------------------------------------------
    ;              Includes
    ;-------------------------------------------------

    include \masm32\include\windows.inc
    include \masm32\include\user32.inc
    include \masm32\include\kernel32.inc

    ;-------------------------------------------------
    ;              Linked Libraries
    ;-------------------------------------------------

    includelib \masm32\lib\user32.lib
    includelib \masm32\lib\kernel32.lib

    ;-------------------------------------------------
    ;              Prototypes
    ;-------------------------------------------------

    WinMain PROTO
    WndProc PROTO hWnd:DWORD, uMsg:DWORD, wParam:DWORD, lParam:DWORD

;================================================
;            .DATA/.CONST/.DATA?
;================================================

.DATA

    MainWindowClass WNDCLASSEX < \
    	Sizeof WNDCLASSEX, 0, Offset WndProc, 0, 0,0,0,0, \
    	COLOR_HIGHLIGHT+1, 0, Offset MainWindowClassName, 0>

.CONST

    MainWindowClassName db "HelloWorldClass",0 ; TODO: Call this HelloWorldWindowClass
    ButtonClassName     db "BUTTON",0
    MainWindowTitle     db "Blank Window",0
    ClickMeButtonText   db "Click me",0
    PopupMessage        db "Hello, world!",0
    PopupTitle          db "Hello, world!",0

.DATA?

    MainWindowHandle    HWND ?
    ClickMeButtonHandle HWND ?
    MessageStruct       MSG  <?>

;================================================
;            .CODE
;================================================

.CODE

start:
    invoke GetModuleHandle, 0
    mov MainWindowClass.hInstance, eax
    invoke WinMain
    invoke ExitProcess,eax

;================================================
;            WinMain
;================================================

WinMain PROC

    ;------------------------------------------------
    ;    Register Window
    ;------------------------------------------------

        ;------------------------------------------------
        ;    Load Icon for Main Window
        ;------------------------------------------------

            invoke LoadIcon, 0, IDI_APPLICATION
            mov MainWindowClass.hIcon,eax

        ;------------------------------------------------
        ;    Load Mouse Cursor for Main Window
        ;------------------------------------------------

            invoke LoadCursor, 0, IDC_ARROW
            mov MainWindowClass.hCursor,eax

        ;------------------------------------------------
        ;    Register the Main Window's Class.
        ;------------------------------------------------

            invoke RegisterClassEx, Offset MainWindowClass

    ;------------------------------------------------
    ;    Initialize Window
    ;------------------------------------------------

        ;------------------------------------------------
        ;    Create Main Window
        ;------------------------------------------------

            invoke CreateWindowEx, WS_EX_CLIENTEDGE,\
                Offset MainWindowClassName,\
                Offset MainWindowTitle,\
                WS_OVERLAPPEDWINDOW,\
                200,200,300,300,\
                0,0,\
                MainWindowClass.hInstance,\
                0
            mov MainWindowHandle,eax

        ;------------------------------------------------
        ;    Add a button that says "Click me"
        ;------------------------------------------------

            invoke CreateWindowEx, WS_EX_STATICEDGE, Offset ButtonClassName,
                    Offset ClickMeButtonText, \
                    WS_VISIBLE or WS_CHILD or WS_BORDER or ES_LEFT,
                    10, 10, 75, 35, MainWindowHandle, 0, \
                    MainWindowClass.hInstance, 0
            mov ClickMeButtonHandle,eax

        ;-----------------------------
        ;    Show Window
        ;------------------------------

            invoke ShowWindow, MainWindowHandle, SW_SHOWNORMAL
            invoke UpdateWindow, MainWindowHandle

        ;-----------------------------
        ;    Begin Message Loop
        ;-----------------------------

            jmp GetMsg

            MessageLoop:
              invoke TranslateMessage, Offset MessageStruct
              invoke DispatchMessage, Offset MessageStruct
            GetMsg:
              invoke GetMessage, Offset MessageStruct, 0, 0, 0
              cmp eax, 0
              jne MessageLoop

    mov eax, MessageStruct.wParam
    ret
WinMain ENDP

;================================================
;            WinMain
;================================================

WndProc PROC hWnd:HWND, uMsg:UINT, wParam:WPARAM, lParam:LPARAM

    ;-----------------------------
     .if uMsg==WM_DESTROY
    ;-----------------------------

        invoke PostQuitMessage, 0

    ;-----------------------------
     .elseif uMsg==WM_COMMAND
    ;-----------------------------

        mov eax,wParam
        and eax, 0FFFFh

        ;-----------------------------
         .if eax == BN_CLICKED
        ;-----------------------------

            mov eax, lParam

            ;-----------------------------
            .if eax==ClickMeButtonHandle
            ;-----------------------------

                invoke MessageBox, NULL, Offset PopupMessage, Offset PopupTitle, MB_OK

            ;-----------------------------
            .endif
            ;-----------------------------

        ;-----------------------------
         .else
        ;-----------------------------

            invoke DestroyWindow, hWnd

        ;-----------------------------
         .endif
        ;-----------------------------

    ;-----------------------------
     .else
    ;-----------------------------

        invoke DefWindowProc, hWnd, uMsg, wParam, lParam
        ret

    ;-----------------------------
     .endif
    ;-----------------------------

    xor eax,eax
    ret

WndProc ENDP


end start
Pretty simple, right? Yeah, not really…
I’ll explain the entire thing below, but first, let’s run it.
Install MASM32
In order to run the code, you’ll need to install MASM. When programming in assembly language, you don’t compile your code, you assemble it. And MASM, or Microsoft Macro Assembler, is the name of the assembler software suite we’ll be using; there are other assemblers out there, but this one is endorsed by Microsoft and is probably the most widely used assembler for Windows.
Steps:
- Download and extract http://masm32.masmcode.com/masm32/masm32v11r.zip
- Run
install.exe - Follow the prompts, accepting all default values
When you’re done, MASM32 should be installed in the folder C:\masm32.
Build and run the program
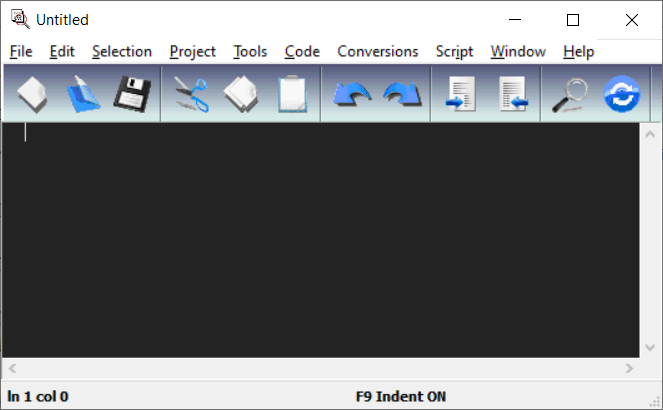
The simplest way to quickly assemble and run the program is to use QEditor, which is included with the MASM32 package.
Run C:\masm32\qeditor.exe. It should look like this:
To load the code into QEditor, download HelloWorld.asm to a temporary directory, then, in QEditor, click File -> Open, and open HelloWorld.asm:

To build the program, choose Project -> Build All. Then, to run the program from the editor, choose Project -> Run Program:

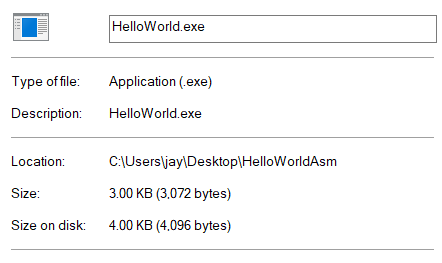
Building the program should produce HelloWorld.exe in the same folder as the HelloWorld.asm:
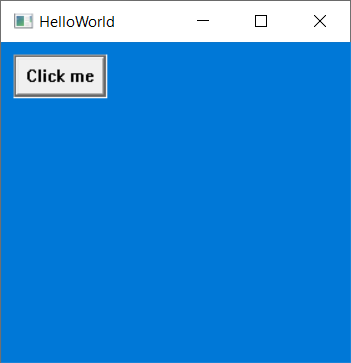
When you run the program, you should see:
Click on “Click me” to see some behavior:
You might want to stop here and try playing around with the code. Next, I’ll try to explain every line of code in the toy program.
The Source Code: Meta-Directives
;------------------------------------------------
;              Meta-Directives
;------------------------------------------------
.386                ; Use the 80386 instruction set
.MODEL FLAT,STDCALL ; Flat memory model, STDCALL argument passing
OPTION CASEMAP:NONE ; Case sensitive procedure names
In MASM, the word Directives is technically used to refer to nearly any special keyword recognized by the assembler. In my “hello world” code, there are a few particular directives which I’ve dubbed “Meta-Directives”: these are “header-like” directives which tell the assembler about how to assemble our program.
.386 means that, in order to run our program, you’ll need an Intel 80386-compatible processor. Since the 80386 processor is the oldest processor that Windows supports, this is the most compatible choice we could possibly make here. Other options are .486, .586, .686, etc.
.MODEL FLAT,STDCALL means two things:
- We’ll be using a “flat” memory model. (And we have no choice: this is actually the only option here accepted by Windows!) The name “flat” for memory model is only of historical interest: with older processors (i.e., 16-bit), accessing more than
2^16bytes of memory in a program had several difficulties, so there was a (convoluted) mechanism where one divided the memory into “memory segments”, and accessed memory as offsets from one of several memory segment pointer registers. When 32-bit came in, this was simplified by essentially “flattening” these segments into one big memory segment, thus the name. - We’ll also be using the
STDCALLstrategy for handling how parameters are passed on the stack from caller to callee for procedure calls; the only other strategy is theCstrategy. The difference is that, withSTDCALL, the caller pushes the parameters onto the stack before calling the procedure, and the callee pops them off the stack just before it returns. With theCstrategy, the caller pushes the parameters to the stack before calling the procedure, then after the procedure returns, the stack is popped. TheCstrategy has the advantage of enabling variable-argument-length procedures, whileSTDCALLhas the advantage of producing smaller executable sizes.
OPTION CASEMAP:NONE means that symbol names (i.e., procedures, labels, variables, etc—we’ll cover these later) are case sensitive. The word casemap refers to “mapping” between lowercase and uppercase; in our case, we don’t want a casemap. (Without this directive, you will actually get errors when attempting to call Win32 API procedures.)
Includes
;-------------------------------------------------
;              Includes
;-------------------------------------------------

include \masm32\include\windows.inc
include \masm32\include\user32.inc
include \masm32\include\kernel32.inc

;-------------------------------------------------
;              Linked Libraries
;-------------------------------------------------

includelib \masm32\lib\user32.lib
includelib \masm32\lib\kernel32.lib
The INCLUDE directive (remember that directives and themselves are always case-insensitive—it’s the symbol names that are case-sensitive) will tell the assembler to include a copy of the specified file; it will be as if the file was copy-pasted as-is into our source code at this line. This is the standard mechanism used to reference other source code files, headers, etc. In this case, I’ve included windows.inc, user32.inc, and kernel32.inc, which are the primary Windows API header files which MASM provides out of the box. (You can use this directive to include any file you want—provide a relative or absolute file path, and the file’s contents will be included in your source code.)
The INCLUDELIB directive tells the linker that the specified library (i.e., .lib file, also known as a module, or a statically-linked library) should be linked into the final executable. Again, MASM provides a set of libraries by default for the Windows API. (You could also create and include your own libraries.)
.DATA, .CONST, .DATA?
The .DATA?, .DATA, and .CONST directives behave differently than the others I’ve just described: these each begin new memory segments. Think of them as regions in RAM that will be accessible to your program at runtime. They differ in that:
.DATA?is where you define global variables whose value you don’t care about at program initialization.DATAis where you define global variables whose initial values you want to specify.CONSTis where you define global, constant, variables whose values can never change at runtime
To define a variable in any one of these sections, the general syntax is:
NAME TYPE VALUE
(Separated by spaces.)
The name can be any alphanumeric string.
The most common primitive types are:
BYTE- An unsigned 1-byte integer (also used for strings) (also aliased asDB)SBYTE- A signed 1-byte integerWORD- An unsigned 2-byte integer (aliasDW)SWORD- A signed 2-byte integerSDWORD- A signed 4-byte integerDWORD- An unsigned 4-byte integer (aliasDD)QWORD- An unsigned 8-byte integer (aliasDQ)SQWORD- A signed 8-byte integerREAL4- A 4-byte floatint point numberREAL8- An 8-byte floatint point number
So, for example, to define an 64-bit unsigned integer named “id” with the value 0:
id QWORD 0
Arrays are also supported. If you define an array of something, they’ll simply be defined sequentially in memory. The syntax is like this:
ids QWORD 1,2,3,4,5
The above would place five 64-bit unsigned integers in a row: 1, 2, 3, 4, then 5.
Interestingly, to define a string, you simply define an array of bytes and each character will be mapped to a byte (usually with a null terminator):
ids BYTE 'h', 'e', 'l', 'l', 'o', 0
The shorthand for this is:
ids BYTE "hello"
(Characters are always one byte; unfortunately, Unicode isn’t directly supported.)
There is also, similar to C, the ability to compose types using STRUCT and UNION.
In MASM, defining a struct itself might look like this:
PRETEND STRUCT
  firstField    DWORD      ?
  secondField   DWORD      ?
  thirdField    DWORD      ?
  fourthField   DWORD      ?
PRETEND ENDS
Declaring an instance of the struct might look like:
MyPretendStructure PRETEND < 10, 20, 30, 40, 50 >
Finally, the .CODE directive is also, technically, a memory segment. Except, instead of defining “data” to go within it, you define executable code. When your program starts, it will point to code that you’ve placed at the beginning of this section.
In order to understand what goes in the .CODE section, you’ll need to understand what CPU registers are and what CPU instructions are.
CPU Registers and Instructions
In the 80386 CPU, there are a well-defined set of registers:
- General Purpose Registers:
eax,ebx,ecx,edx - Index Registers:
esi,edi - Segment Registers:
cs,ds,es,fs,gs,ss - Instruction Pointer Register:
eip - Stack Pointer Registers:
ebp,esp - Flags:
eflags
Registers are the fastest type of memory, and are embedded inside the CPU. For now, just know that most of them have a special purpose; except for the general purpose registers, which you can freely manipulate any way you like.
There are hundreds of CPU instructions. These are hardware-based procedures that manipulate registers (or RAM) in various ways. Most of them only accept 0 to 3 arguments (but there are exceptions). Sometimes arguments must be registers, sometimes integers, etc. Some instructions accept either (i.e., are overloaded). Below, I list a few of the the most common instructions:
| Instruction | First Argument | Second Argument | Description |
|---|---|---|---|
mov |
dest |
src |
Copy the value of src into dest |
add |
dest |
src |
Store the result of dest + src into dest |
sub |
dest |
src |
Store the result of dest - src into dest |
xor |
dest |
src |
Store the result of the bitwise dest XOR src into dest |
and |
dest |
src |
Store the result of the bitwise dest AND src into dest |
or |
dest |
src |
Store the result of the bitwise dest OR src into dest |
not |
dest |
Flip all the bits of dest |
|
cmp |
src |
dest |
Compare src and dest (described below) |
(See Wikipedia for a complete list.)
You can do a lot with just the above instructions. As a quick example, after running the following snippet, the eax register will be equal to 42:
mov eax, 25    ; eax now equals 25
sub eax, 5     ; eax now equals 20
mov ecx, eax   ; ecx now equals 20
add eax, ecx   ; eax now equals 40
or eax, 2      ; eax now equals 42
Memory addresses
Notice how in the previous code snippet, each argument to each instruction is either a register, or a raw numeric value. Notice how most instructions which result in an output value usually store their output back into the register passed as their first argument.
Importantly, you can almost always substitute a data pointer (i.e., the memory address of something in a data segment) in place of a register. For example, a variable defined in one of the .DATA/.DATA?/.CONST sections, like this:
.DATA

count DWORD 0

.CODE

mov count, 2
add count, 4
add count, 5
mov eax, count
After the above code is finished, eax will equal 11.
The next instruction I’ll introduce is jmp:
| Instruction | First Argument | Description |
|---|---|---|
jmp |
addr |
Copy the memory address addr into EIP |
The jmp instruction performs a “goto”. It takes a single argument: an instruction pointer (i.e., the memory address of something in the .CODE memory segment). Usually, this will be in the form of a label. A label is simply a name given to a (code) memory address, which is simply a pointer to somewhere in your code, for example, start: in our “Hello, world” program.
Under the hood, there is a CPU register named EIP. The EIP register is the “instruction pointer” register: it is a special-purpose register which points to the next assembly language instruction which should be run after the currently-executing one. The jmp instruction works by taking an address as an argument, and storing the specified address into the EIP register, effectively jumping to that address.
The following code demonstrates how to use jmp. The output (stored in eax) will be 42:
jmp a
b:
    add eax, ecx   ; eax is now 40
    add eax, 2     ; eax is now 42
    jmp c
a:
    mov eax, 20    ; eax is now 20
    mov ecx, eax   ; ecx is now 20
    jmp b
c:
Conditionals
The instructions I’ve listed so far don’t yet allow us to do something which is vital to computer programming: conditionals. For this, we introduce the cmp instruction, which compares a register against a value. Interestingly, it does several comparisons at once.
For example, if you call cmp eax, ecx, it will calculate, all at the same time, whether eax<ecx, eax≤ecx, eax=ecx, eax≥ecx, eax>ecx, etc. It does this by storing all of these results in multiple different bits of the eflags register (which is sort of a warehouse of single-bit flags). After you do this, you can conditionally jump to an address using one of several instructions:
| Instruction | First Argument | Description |
|---|---|---|
je |
addr |
jmp to addr if arg1 = arg2 |
jne |
addr |
jmp to addr if arg1 != arg2 |
jg |
addr |
jmp to addr if arg1 > arg2 |
jge |
addr |
jmp to addr if arg1 >= arg2 |
jl |
addr |
jmp to addr if arg1 < arg2 |
jle |
addr |
jmp to addr if arg1 <= arg2 |
For example, after the following code finishes, eax will equal 100:
mov eax, 0
count_to_100:
  add eax, 1
  cmp eax, 100
  jl count_to_100
The stack
This count_to_100 sort of seems like…a procedure! Except, it doesn’t take any arguments. If we wanted to create “procedures” that take arguments, we’d need to take advantage of the stack. “The stack” is simply a dedicated region of memory in the active process where we can “push” and “pop” data using following two extremely important instructions:
| Instruction | First Argument | Description |
|---|---|---|
push |
src |
“push” the value of src onto the stack |
pop |
dest |
“pop” the stack, storing the result in dest |
The src argument can be a value, register, or memory address. The dest can be a register or memory address. For example, let’s say we want to create a procedure that adds five numbers, then returns the result. We could code it like this:
;---------------------------------------------------------------------------------
; "add5" assumes that five 32-bit unsigned integers have been pushed to the stack.
; It will pop them off, one at a time, adding them together, then the result
; will be returned in the "eax" register.
;---------------------------------------------------------------------------------
add5:
  ; eax will represent our return value
  mov eax, 0
  ; edx will be used as a temporary variable
  mov edx, 0
  ; add arg1 to eax
  pop edx
  add eax, edx
  ; add arg2 to eax
  pop edx
  add eax, edx
  ; add arg3 to eax
  pop edx
  add eax, edx
  ; add arg4 to eax
  pop edx
  add eax, edx
  ; add arg5 to eax
  pop edx
  add eax, edx
Then, we could call it like so:
push 10
push 20
push 30
push 40
push 50
jmp add5
At the end of our program, eax would equal 10+20+30+40+50=150. This works for this small program, but for larger programs, it has a major flaw: when add5 is finished, it doesn’t return back to where we were before we called it; it simply moves on to whatever code we’ve defined just after we define add5! The solution to this is to use the call and ret macros, which solve this problem for us:
; redefine add5 using ret at the end
add5:
  mov eax, 0
  mov edx, 0
  pop edx
  add eax, edx
  pop edx
  add eax, edx
  pop edx
  add eax, edx
  pop edx
  add eax, edx
  pop edx
  add eax, edx
  ret
We can now call it more than once, for example:
push 10
push 20
push 30
push 40
push 50
call add5
; eax will now equal 150

push 11
push 22
push 33
push 44
push 55
call add5
; eax will now equal 165
In fact, the way that call and ret work under the hood is that, when call is invoked, it pushes the EIP register to the stack before jmp-ing, and when ret is called, it pops the stack back into the EIP register.
Note that returning values through the eax register is the de-facto standard.
Procedures and macros
Basic assembly syntax is fairly primitive, but recall that MASM is a macro assembly language: this means it’s assembly language with macros. A macro is very similar to the traditional idea of a procedure (or function) from your other favorite programming language, except that the output of the macro occurs at assembly time rather than at runtime.
In the C programming language, you can define macros, too, with #define: for example, if you wrote #define PLUS_FIVE(x) (x+5), and you called PLUS_FIVE(10), the value would compile as 15as soon as you compiled your code, rather than at runtime. This is more of a common practice in assembly language than high-order languages, as is a big reason why assembly language can be so fast.
You can define a macro like this:
MyMacro MACRO arg1,arg2,arg3,arg4
    mov arg1, arg2
    add arg3, arg4
ENDM
I could then use the above like this:
MyMacro eax, 0, ecx, 5This would result in the following code being produced:
mov eax, 0
add ecx, 5
MASM provides several fundamental macros out of the box. For example, PROC, ENDP, and INVOKE, which respectively begin, end, and invoke a procedure. We can use these to simplify our previous code:
; redefine add using PROC and ENDP
add5 PROC arg1:DWORD, arg2:DWORD, arg3:DWORD, arg4:DWORD, arg5:DWORD
  mov eax, 0
  add eax, arg1
  add eax, arg2
  add eax, arg3
  add eax, arg4
  add eax, arg5
  ret
ENDP
; call add5
INVOKE add5 10,20,30,40,50
A few other important macros are the .IF, .ELSEIF, .ELSE, and .ENDIF macros. These perform conditionals in way familiar to anyone who’s ever used any other imperative programming language. For example, the following two are equivalent:
;-----------------------------
; Conditional using IF macro
;-----------------------------
.IF eax < 50
    add eax, 50
.ELSE
    sub eax, 50
.ENDIF
;---------------------------------
; Conditional using raw assembly
;---------------------------------
cmp eax, 50
jge else
if:
add eax, 50
jmp endif
else:
sub eax, 50
endif:This should make it clear that macros allow you to keep your code a little bit cleaner without sacrificing the raw speed and flexibility you get out of assembly language.
Let’s get back to our HelloWorld program.
.CODE
This section is where the important stuff begins.
When you assemble your program, you’ll need to provide an “entry point” into your executable. You do this with a label, which, as we’ve already discussed, are those things that you can jmp to (memory addresses that point to code). The standard is to name the entry point label start:
start:The first thing that the HelloWorld program (and indeed any Windows API program) does is call GetModuleHandle, which returns our application’s “Windows handle” (i.e., an integer given to us by the OS that uniquely identifies our Windows application). We do that with invoke GetModuleHandle, 0: this calls a procedure named GetModuleHandle, and passes 0 as its only argument.
The only reason we’re able to invoke GetModuleHandle is that a prototype for the GetModuleHandle procedure is included within kernel32.inc, which we’ve included in this file. If you’ve used C or C++, an assembly language prototype is similar to a pre-declaration you’d see an a .h file. The prototype for GetModuleHandle looks like:
GetModuleHandle PROTO STDCALL :DWORD
This prototype declaration says: “hey, I promise that in some library that you’re linked to, I’ve defined a label named GetModuleHandle, and if you want to invoke it, you should use the STDCALL argument-passing strategy, and pass it one argument, and that argument is a 4-byte unsigned integer.” We then store this pointer in our MyWindowClass global variable with MyWindowClass.hInstance, eax.
The line mov MyWindowClass.hInstance, eax means that the return value of the most recently called procedure should be stored in the MyWindowClass.hInstance variable.
To reiterate, the following code will invoke GetModuleHandle, store the result in a variable, then invoke WinMain, then invoke ExitProcess.
invoke GetModuleHandle, 0
mov MyWindowClass.hInstance, eax
invoke WinMain
invoke ExitProcess, eax
That’s the entirety of the “top-level” code. But notice how, above, we’re calling WinMain. Let’s look into it.
WinMain
;------------------------------------------------
;    Register Window
;------------------------------------------------

    ;------------------------------------------------
    ;    Load Icon for Main Window
    ;------------------------------------------------

        invoke LoadIcon, 0, IDI_APPLICATION
        mov MainWindowClass.hIcon,eax

    ;------------------------------------------------
    ;    Load Mouse Cursor for Main Window
    ;------------------------------------------------

        invoke LoadCursor, 0, IDC_ARROW
        mov MainWindowClass.hCursor,eax

    ;------------------------------------------------
    ;    Register the Main Window's Class.
    ;------------------------------------------------

        invoke RegisterClassEx, Offset MainWindowClass
Since this is a Windows GUI application, we want a “window” to be visible when our program starts. The Windows API requires us to do three things before we can create an instance of a window:
- Define a variable of type
WNDLCASSEXwhich will represent our window class (we named itMyWindowClass) - Register our window class with the OS
- Create the window (as an instance of the window class)
As far as populating the MyWindowClass variable: we’ve done this partially in our .DATA section. But, in the .DATA section, we were only able to provide static values. Some fields, like the application’s icon and mouse cursor, we need to do at runtime, because we’ll need to call some procedures to get the data. In the code shown above, we invoke LoadIcon and LoadCursor (both being part of the Windows API) to load the standard window icon and a mouse cursor into memory, and we store pointers to these memory allocations in the MainWindowClass structure.
Once our MyWindowClass structure is populated, we can invoke RegisterClassEx. This tells the operating system to make our MyWindowClass an eligible to create instances of.
;------------------------------------------------
;    Create Main Window
;------------------------------------------------
invoke CreateWindowEx, WS_EX_CLIENTEDGE,\
    Offset MainWindowClassName,\
    Offset MainWindowTitle,\
    WS_OVERLAPPEDWINDOW,\
    200,200,300,300,\
    0,0,\
    MainWindowClass.hInstance,\
    0
mov MainWindowHandle,eax
When we call CreateWindowEx, our window will be created, which means it will officially open up on our screen. I’ll skip explaining the list of arguments I’ve provided, but you can read about them in the official CreateWindowEx documentation. It has a return value: a “window handle”, which is a pointer to the instance of our window—we’ll store this in the variable MyWindowHandle.
When the window is created, it won’t actually be visible yet (we’ll do that in a second). And, even if it did, it would just be a completely blank window. A blank window is boring, so we’ll put a button in our window that says “Click me”:
;------------------------------------------------
;    Add a button that says "Click me"
;------------------------------------------------
invoke CreateWindowEx, WS_EX_STATICEDGE,
        Offset ButtonClassName,
        Offset ClickMeButtonText, \
        WS_VISIBLE or WS_CHILD or WS_BORDER or ES_LEFT,
        10, 10, 75, 35,
        MainWindowHandle, 0, \
        MainWindowClass.hInstance,
        0
mov ClickMeButtonHandle,eax
With the above code, we’ve created an instance of the built-in window class named “BUTTON”, made it a child of our main window, and placed it at coordinates x=10, y=10, with width=75, height=35. Now, we can make the window visible:
;-----------------------------
;    Show Window
;------------------------------
invoke ShowWindow, MainWindowHandle, SW_SHOWNORMAL
invoke UpdateWindow, MainWindowHandle
ShowWindow tells the operating system that the window is now visible, while UpdateWindow forces the window to re-paint itself; after both of these, the window will immediately show on the screen.
The next step is to invoke the Windows event loop. This is a standard Windows API pattern which we’re simply implementing in assembly language. When you click on the screen, resize the window, minimize, maximize, close, or do anything else with the window, it will be sent to the window in the form of a Windows message, which will be processed in the following loop:
;-----------------------------
;    Begin Message Loop
;-----------------------------
jmp GetMsg
MessageLoop:
  invoke TranslateMessage, Offset MessageStruct
  invoke DispatchMessage, Offset MessageStruct
GetMsg:
  invoke GetMessage, Offset MessageStruct, 0, 0, 0
  cmp eax, 0
  jne MessageLoop
The above code first jumps directly to GetMsg, which invokes GetMessage, which polls the operating system for a message. It returns a boolean value: 1 means a message was found, and 0 means there are no more message and the application should exit. If it returns 0, the cmp and jne instructions will jump to MessageLoop, which attempts to process the message (I’ll explain in a second). Also, if GetMessage was successful, it will store a pointer to the message in MessageStruct.
Calling TranslateMessage and DispatchMessage will cause the message to be sent to our WndProc, which we’ll discuss next.
WndProc
While WinMain is the procedure that is called when the application starts, WndProc is the procedure that is called every time a message occurs. Let’s review the outer skeleton of our definition of WndProc:
WndProc PROC hWnd:HWND, uMsg:UINT, wParam:WPARAM, lParam:LPARAM

    .if uMsg == ...

        ...

    .endif

WndProc ENDP
This means we’re defining a procedure which takes three arguments: hWnd, uMsg, wParam, and lParam.
The uMsg variable represents the type of message received. A few examples are:
WM_MOUSEMOVE- This means the user moved their mouseWM_LBUTTONDOWN- This means the user pressed the left mouse button downWM_RBUTTONDOWN- This means the user pressed the right mouse button downWM_CHAR- This means the user typed a character on the keyboardWM_DESTROY- This means the user tried to close the windowWM_COMMAND- This does several things (see below)
The two types of messages we care about in our program are WM_DESTROY and WM_COMMAND.
When a WM_DESTROY message is received, it means the user has requested to close the window (i.e., by clicking the “X” button in the top-right corner). If we want, we could actually refuse the request. But, being polite programmers, the appropriate response is to call PostQuitMessage:
;-----------------------------
 .if uMsg==WM_DESTROY
;-----------------------------

    invoke PostQuitMessage, 0
What PostQuitMessage does is actually post another message, WM_QUIT, to our message queue: WM_QUIT is a special message which will result in the next GetMessage call returning 0, which will our message loop, which will end our program.
When a WM_COMMAND message is received , it could mean any number of things. One thing is could mean is that the user clicked the “Click me” button. And, if this is the case, then, according to the official Windows API documentation for buttons:
uMsgwill be equal toWM_COMMAND, and- The lowest 16 bits of
eaxwill be equal toBN_CLICKED, and - A pointer to which button was clicked will be in
lParam
Thus, we can handle a button click with, essentially, the following:
.elseif uMsg==WM_COMMAND
mov eax, wParam
and eax, 0FFFFh
.if eax == BN_CLICKED
mov eax, lParam
.if eax == ClickMeButtonHandle
invoke MessageBox, NULL, Offset PopupMessage, Offset PopupTitle, MB_OK
;...
.endif
.endif
;...
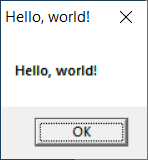
.endifThe MessageBox procedure is a built-in Windows API procedure which will launch an “OK/CANCEL”-style dialog box, which is common in Windows programs. In this case, we want the message displayed on the dialog to be the string given in data variable PopupTitle, and we want the title bar to display the string given in PopupTitle. The MB_OK constant says that we simply want the dialog to have an “OK” button. The popup will look like this:
Finally, our message handler procedure also has a final .else clause which handles “other” message types:
.else
    invoke DefWindowProc, hWnd, uMsg, wParam, lParam
    ret
.endif
Calling DefWindowProc (“default window procedure”) allows Windows to perform default handling for all sorts of message types which we don’t want to worry about.